Smithy's Painted Furniture

Tuesday, 24 May 2011

Summer Market excitement!

I am very excited about the forthcoming local Summer Market, in which I have my first stall. It runs for eight Saturdays through our (so called) summer. It will be very interesting to see peoples reaction to the furniture as I have only previously sold on eBay, which I don't think is the ideal medium to sell these things, however deciding on a price for each item I think will be tricky as of course on eBay it finds it's own level. So I have been busy painting and am looking forward to the first day which is this Saturday. The pitch is only 2m square so there won't be that much room, any tips would be appreciated!


I've been a bit rubbish on the photo front recently, but here are a few things I've been working on,


 This dressing table that has a mirror to go on top, this photo doesn't do it justice, the top is veneer but I managed to sand it back then varnish it, it's very similar to the first chest I painted and I've seen a few like this around so they must have been very popular (common).


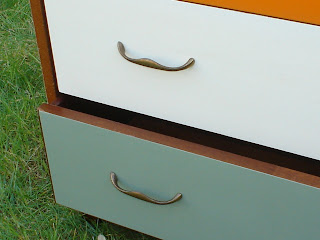
This retro chest of drawers, that I sprayed to give a nice finish, I am pleased with the way it turned out..


This is a modern coffee table, so all I did was paint the legs then distress glaze and wax, works well.


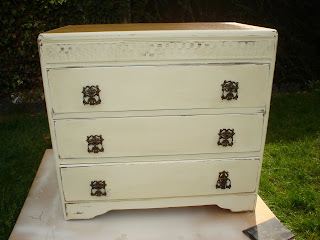
There is also this funny little chest which is home made (not by me) and I couldn't decide what to do with it, so in the end I just went 'rustic', not really sure about the end product maybe I should put some sort of stencil on it or something.......it's only small but I'll tell you one thing it is a lot heavier than it looks!


I've done a couple of other things and some small mirrors and painted signs, so we'll have to see how this week goes and take it from there, will I need more pieces for the next one? only time will tell, I'm looking forward to it!

Here are some more photos of the retro chest......


and here is a slightly better picture of the dressing table, with the mirror attached, I think it makes a big difference.

Wednesday, 11 May 2011

"card" table......

I'd like to share my most recently completed project,


This has been a bit of a marathon due to some  unforseen discoveries, more of which to follow, surfice to say it is now finished and I am pretty pleased, (pleased that it's finished and with the end result). The cards on the top are decoupage, and the inside of the drawer is dark green,


I scanned the playing cards spread out on the scanner in five lots on to thick lining paper then cut them out and stuck them to the table with paste.


The paintwork is matt emulsion with a wax finish and the top has been varnished.


Now, I don't want to go on and on, but this table has been a voyage of discovery (pain in the proverbial). We bought it at auction (heavily painted) but it looked pretty nice and didn't inspect it too carefully but when we picked it up realised most of it was made of the dreaded MDF!  


 I've got nothing against MDF in the right place but that place is not in a table that I want to distress to expose the wood.
 Okay, the legs and the trim were pine so that's not so bad I can still distress it. Started to strip it and found a strange pattern coming through..........


very odd, the whole thing was covered in this weird paper which was an absolute pig 
(no dissrepect to pigs) to get off! 


 So eventually all stripped I decided to stain the timber bits darker for when it showed through the distressing, all back on track.


After priming and the customary age contemplating what colour to paint it, decided on the green and away we go, looking good. Took some sand paper to it to expose that wood and........oh dear, where I sanded it, it went yellow! Not a nice creamy yellow that you could just about get away with but a nasty acid yellow. What next! this would never do, so decided not to distress it after all. 
When it was all painted and waxed I got on with the paper sticking and all was well, except, this little table had one last suprise for me. The acrylic varnish I used to seal the top made the colours smudge on the paper.......aghhhhhhhhhh! I blotted it where I could and although it's not as perfect as I would of wanted it, it's not too bad really and it will have to do because I am beyond the point of no return with this one..............and breathe.


I do have one more card to stick on it though............................


thanks for reading!


Friday, 29 April 2011

Quick side table paint job


This was a quick makeover, for a (very roughly) white painted side table, which, to be fair, doesn't look that bad in the before photo, but it was.


Being already painted, it just needed a quick rub down, then let the painting begin! The colour, believe it or not, is called 'Gravel', not very inspiring but  I think it looks quite classy. Then a quick distress and a couple of coats of wax and voila!

Doing such an instant makeover was very satisfying but in the before photo you can see a small chest of drawers in  a similar 'finish'. I need to think a bit more about that one and it still awaits it's fate.........

Tuesday, 26 April 2011

Things I have Learnt...........

There are a few thing I have learnt over the last month or so, firstly, when it comes to used furniture nothing can be taken for granted! This can be good or bad, I now know that it pays to look thoroughly at a piece before buying, a nice piece that turns out to be part MDF, extra inhabitants included that you didn't notice, things sometimes look smaller when you get them home, or bigger! A beautifully made piece of furniture picked up for a song, (almost) too nice to paint, look beyond the skin to see the beauty. Auctions are good fun and frustrating, it's amazing what people don't want and amazing what some people will buy.
All these things and more have added to the enjoyment of my new "hobby".
I have also found out it is easy to spend almost as long thinking about painting  something as actually doing it! 
Paint will take ages to dry when you want it to dry fast and will dry as soon as it hits the wood when you want it to stay wet. Wax is remarkable.
 I have discovered as well, that photographing furniture is by no means easy. if you photograph it on its own it can look lost and neglected, or you can cover it in stuff 'till you can hardly see it, what looks good to the eye can look 'different' on the screen. Daylight is good, bright sunlight is bad, this and that effect the colour, flash is limiting, that's not straight, that's too high, that's too low, too far away, too close, too blurred, too light, too dark, perfect!
Another thing that has become obvious is my wife and family's patience now that I have turned our house in to a furniture warehouse, it is addictive isn't it?
Of course I have learned what a fantastic amount of talented people and inspiration there is here in Blogland, how kind people are with their comments and free with there advice and encouragement, thank you.
I have learnt all this and more while pursuing a simple interest that started with....."just get on and do it", it can be done, I should have done it sooner!


Tuesday, 19 April 2011

Cool Britannia!

Well it was only a matter of time, there's loads of inspiration for Union Jack furniture here in blogland, notably this chest at Lilyfield Life, I just had to put it on something and this table seemed ideal!


Take one bog standard coffee table, prime and get drawing.


Lots of lines and head scratching later, and we are getting there.


Once the painting was done it was time to distress it and I must admit I felt a small pang of guilt defacing my county's flag, but it had to be done.


 Two coats of polyurethane for the top, wax for the legs and Bob's your uncle! It's safe and sound in my son's bedroom...for now ...but I'm going to try and sell it, if he'll let me!


and no, his room isn't normally that tidy........

Saturday, 16 April 2011

Cabinet finished! martini anyone?

Here is the finished 60s cabinet, with turquoise and black colour scheme, just right for that drinks party in your retro home!

So this was painted in primer, matt emulsion then many coats of (thinned) water based satin varnish. I repaired and re-painted the wavy back board and used spray black satin on the legs. The inside was in pretty good condition so I touched up the worst scratches and waxed like a madman.
It scrubbed up pretty well I think, now where did I put that cocktail shaker...........

Wednesday, 6 April 2011

Decisions, decisions...........

That drinks cabinet; I thought it would be really simple to give it the look I wanted but...no. First I couldn't decide what colour it was to be, I must have mucked about and tweaked four or five colours before settling on the one and even then I wasn't completely convinced! Then I started agonising about the finish. I wanted to hand paint it but also have that plasticy 60s feel so started fretting about brush marks! So I've been rubbing it down then re coating it thinly but now I've decided, it comes out like it comes out or I'll be at it forever. I think it will be alright and I'm looking forward to finishing it now. I'll stick some pictures up when it's finished, soon.....I hope.